
So you got Ubuntu installed on your Windows machine, but you’re more of a Debian person. Well this post is for you. (If you haven’t yet enabled WSL and got Ubuntu running, check out my Part 1 post walking through that!)
These steps will switch WSL to use Debian, but don’t worry, it’s easy to undo them and switch back to Ubuntu. Please follow the steps carefully, as doing things out of order may cause it to fail. There are many ways to do this, and sometimes I know I’m skipping some shortcuts, but I just want to make these instructions as simple to follow as possible.
Part 2: Transitioning WSL to Debian
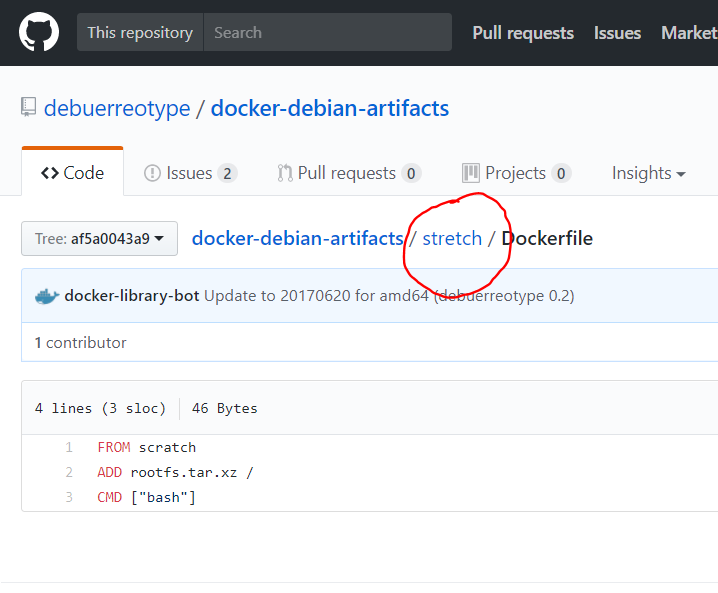
- In your browser we must download the Debian docker image. Go to https://hub.docker.com/_/debian/ and find the build you want. As of this writing, the latest version is stretch. Just look for the line that includes the word “latest”. Click the link in that line. Currently it says (stretch/Dockerfile).
- It should take you to a github page. You need to go one level back from the dockerfile page to find the location of the actual image. In this case, the link says “stretch”
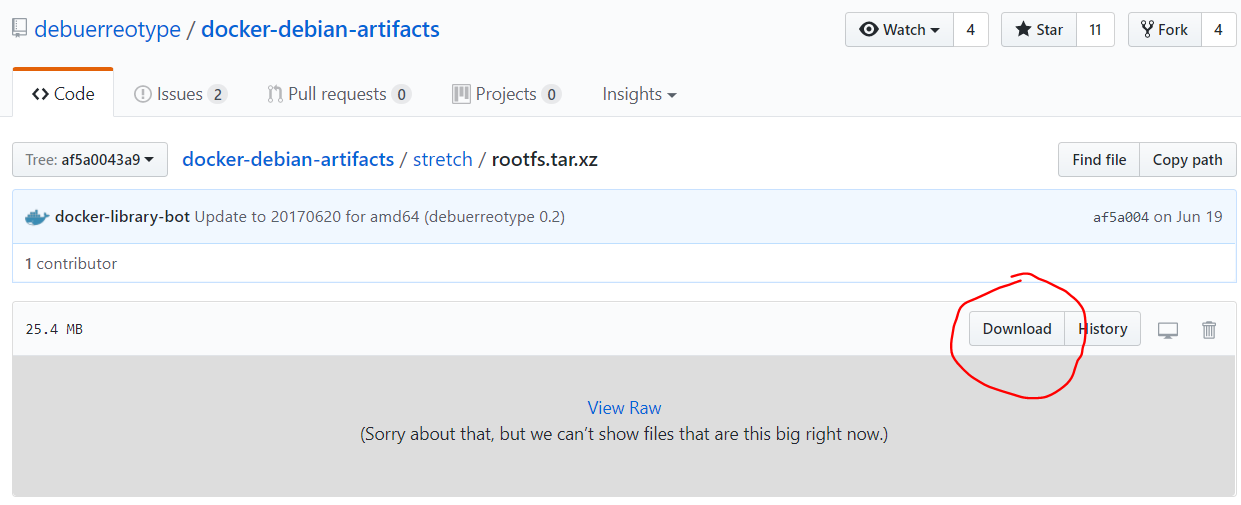
- Find the file that is named “rootfs.tar.xz” and click on it. It should take you to the github page for this file, and click on the Download button.
- Find where this file was downloaded to and take note of this location. Usually it will be in your Downloads folder or your Desktop, depending on how your browser is set up. Do not try to extract the file yet.
- Open your Ubuntu bash prompt (there should be a listing in your Start menu for Bash on Ubuntu on Windows)
- Create a folder to extract the archive to:
cd ~
sudo mkdir rootfs.debian
- Next we’re going to copy the image file to your home directory. (not move in case we mess something up we still have the original). You’ll need to substitute the Windows path where you had downloaded the archive to the Linux path name.
Example: I downloaded to:
“C:\Users\scott\Downloads\rootfs.tar.xz”
so the path from within Linux is:
/mnt/c/Users/scott/Downloads/rootfs.tar.xz - So in my case the command would be (in case it’s hard to tell from the formatting, this is all one line, just a space before the ~):
sudo cp /mnt/c/Users/scott/Downloads/rootfs.tar.xz ~/rootfs.debian/rootfs.tar.xz
(NOTE: Linux is case sensitive, and make sure you use the correct slashes. You can use tab when typing to complete some path names.)
- Extract the archive:
 cd ~/rootfs.debian

 sudo tar xf rootfs.tar.xz
- Exit the terminal by entering:
exit
- Open any folder in Windows, clear out the path in the Address bar and type in: “%localappdata%\lxss” without quotes then hit enter.
- Click onto the rootfs folder and rename it to rootfs.ubuntu
- Open the home folder, then open your username folder and find rootfs.debian. Right click on this folder and select “Cut”
- Go back to the lxss folder, then right click in the folder and select “Paste”
- Rename this folder to rootfs
- Since the user you had been using in Ubuntu is not set up in Debian, we must switch Debian to use the root account. Open a Windows command prompt and type:
lxrun /setdefaultuser
- When asked for the new Unix username, enter: root
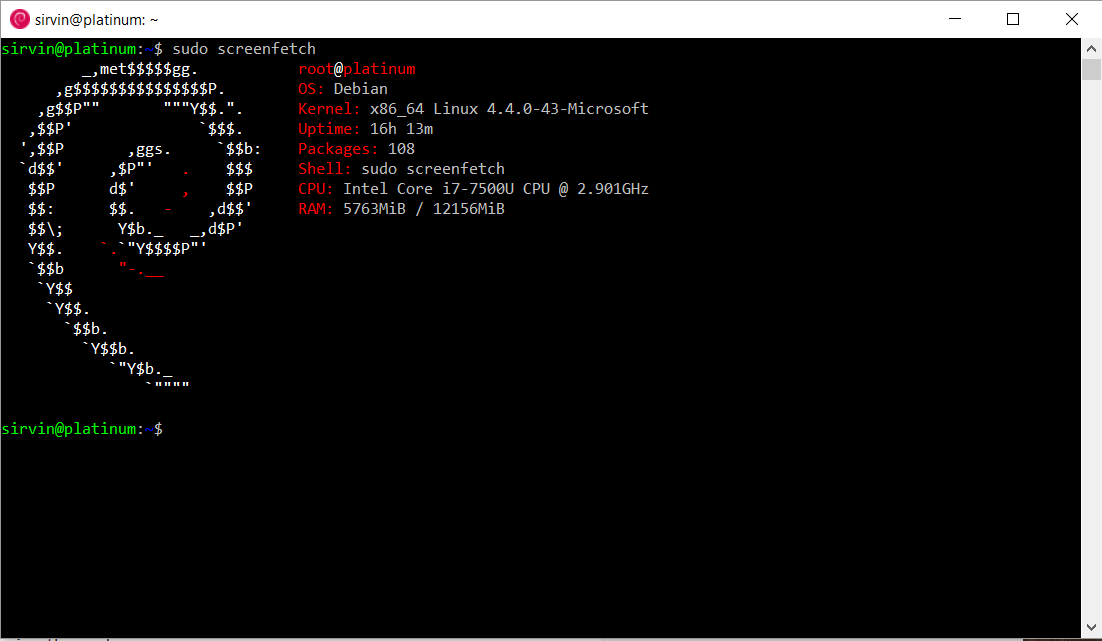
- Type bash then hit enter. You are now in debian! However, it’s pretty broken at this point, so keep reading!
- Set a root password by entering:
passwd
- Get the latest list of available updates by entering:
 apt-get update

 apt-get upgrade
Hit y to agree to prompts to install these updates. You may notice some errors about your locale. Let’s fix that.
- Run:
apt-get install locales
Once this is installed, run:
dpkg-reconfigure locales
Hit enter to go through the list of locales. For Americans you can then enter en_US.UTF-8. For other people, choose the appropriate language.
When asked for the default locale, I just choose option 3. - The ps command is missing, so let’s fix that:
apt-get install -f procps
- Another thing that’s missing but helpful is the ability to extract .xz files, in case you need to do anything like this again from within Debian. This command installs the xz utilities:
apt-get install xz-utils
- You’re probably getting an error about resolving a hostname. Take note of your computer’s name. Then let’s install nano for a quick way to edit files in Linux.
apt-get install nano
- Run nano to edit the hosts file
nano /etc/hosts
- Beneath the line that says 127.0.0.1 localhost, add a line that says:
127.0.0.1 hostname
(filling in your computer’s name as the hostname). - Hit CTRL-o then enter to save the file. Then CTRL-x to exit nano.
- Install sudo so you can run as an account other than root:
apt-get install sudo
- Add a new user substituting username for the username you’d like (no spaces allowed):
useradd username -G sudo
- Set up a password for this account, putting in your actual username:
passwd username
- Then exit. You’re back at the dos prompt. Now let’s tell WSL to launch as this new user instead of root:
lxrun /setdefaultuser
Then type in your new username.
- Test this out by typing bash. You should be logged in as the new user. To verify try typing the command:
whoami
- Two last things that are optional. You can change the shortcut in the start menu to now say Debian, and you can change the icon.
- Click Start, right click on “Bash on Ubuntu on Windows” then More -> Open File Location
Rename this file to Bash on Debian on Windows - Next in the path name type in: %localappdata%\lxss then hit enter.
Rename the bash.ico to bash.ico.ubuntu. If you’re not seeing the .ico extension, click the View tab up top and make sure “File name extensions” is checked.
Download this icon and save it to the folder with the name bash.ico.
- That should be it! It might take a reboot to get the icon updated everywhere on your system.

NOTES
if you want to undo this, assuming you used the same username for both Linuxes, all you need to do to have this launch Ubuntu is rename the rootfs folder to rootfs.debian and rename the rootfs.ubuntu folder back to rootfs. And of course restore the old icon.
Pingback: Installing Ubuntu Linux on Windows 10 with WSL (Windows Subsystem for Linux) | scott topic
Follows the same mechanism that Fedora, Arch and others have used to replace Ubuntu with their distro of choice: Note that this will only work for a while since we’re improving the way distro’s are installed and managed in future releases.